
15 Easy Leprechaun Trap Ideas For Kids (Fun & Simple DIY!)
Creating a leprechaun trap is one of those St. Patrick’s Day traditions kids talk about for weeks. There’s just something magical about building your own leprechaun trap, setting it out overnight, and waking up to signs of a sneaky little leprechaun who almost got caught.
Whether this is your first year or a tradition you’ve carried on from previous years, these 15 easy leprechaun trap ideas for kids are a fun way to spark imagination, encourage problem-solving skills, and create memories your kids will never forget.
The best part? You don’t need fancy supplies. Most of these DIY leprechaun traps can be made with items from the dollar store, recycled boxes, or things you already have at home.
If you’re trying to keep March afternoons screen-free, you’ll also love these 200 screen-free activities for kids.

Table of Contents
Affiliate Links Disclosure
This post may contain affiliate links. This means I may earn a small commission at no extra cost to you if you purchase through one of my links. These commissions help support this site and allow me to continue sharing fun ideas, free printables, and creative projects for families. Thank you for supporting The Foreign Mom 💚
Why Leprechaun Traps Are Such a Fun Tradition

Building a leprechaun trap isn’t just a craft; it’s a fun activity that blends creativity, storytelling, and STEM learning into one magical experience.
Here’s why families, like my own, love this tradition:
It’s a great way to celebrate St. Patrick’s Day without screens
Encourages problem-solving skills and planning
Works for kids of all ages (toddlers to elementary kids)
A perfect STEM activity disguised as play
Let’s kids imagine sneaky, mischievous leprechauns and little green men running around the house
From a traditional box trap to a clever secret trap door, every child gets to design their own trap in a creative way.
These traps are secretly great for fine motor and problem-solving skills that show up in this kindergarten readiness checklist, too.
Easy Leprechaun Trap Ideas Using Simple Materials
You don’t need anything complicated to build homemade leprechaun traps. In fact, simple materials usually lead to the most creative traps.
Popular supplies include:
Shoeboxes or cereal boxes
Toilet paper rolls and cardboard tubes
LEGO bricks for a LEGO leprechaun trap
Cotton balls for clouds or cotton ball clouds
Green poster board, white cardstock, and washable paint
Little bins, cereal boxes, and paper rolls
A shoebox leprechaun trap or cereal box leprechaun trap is often the perfect starting point, easy to build, sturdy, and endlessly customizable.
Short on time? Try the Rainbow Cup Trap or Magic Hat Trap (5 minutes). Want a wow factor? Do the Leprechaun Hotel or St. Patrick’s Day City. Love STEM? Pick a falling floor or pitfall trap.
Little hands using scissors? Grab these free cutting practice worksheets to build scissor skills before craft time.
15 Easy Leprechaun Trap Ideas For Kids
Looking for fun and creative leprechaun trap ideas for kids? These 15 traps are easy to make, full of imagination, and perfect for celebrating St. Patrick’s Day. Using simple supplies and clever designs, each idea is a fun way to trick a sneaky leprechaun while encouraging creativity and hands-on play.
Adult note: For traps that require a craft knife or hot glue, grown-up help is recommended.
1. Rainbow Slide Trap
Create a tall rainbow made from construction paper leading down into a shoebox. Add glitter “gold” at the bottom so the leprechaun slides right in.

Supply List:
1 empty shoebox (lid removed)
- Brown or Kraft paper (to cover box, optional)
Construction paper in rainbow colors (red, orange, yellow, green, blue, purple)
Gold glitter or gold craft foam
Plastic gold coins or yellow buttons/paper circles
Green construction paper (for shamrocks/grass)
Scissors
Glue stick or liquid school glue
Clear tape
Pencil and ruler
Step-by-Step Instructions:
1. Prep the Shoebox Base
- Cover the outside of the shoebox with brown or kraft paper if you want a neater look.
- Glue the paper down and let it dry.
2. Make the Rainbow Strips
- Cut long strips of construction paper (about 1–1.5 inches wide) in each rainbow color.
- Line them up in order (red, orange, yellow, green, blue, purple) and glue the strips side by side to create one big rainbow.
3. Shape the Rainbow Slide
- Gently bend the rainbow into an arch so it can stretch from the table surface up to the inside edge of the shoebox.
- Tape one end inside the back of the box and the other end to the table or to a small piece of cardboard in front of the box to keep it stable.
4. Create the “Gold” Landing Spot
- In front of the shoebox opening, spread a puddle of glue on the table or on a small piece of cardboard.
- Sprinkle gold glitter over the glue to make a sparkling “gold” pile. Shake off the extra.
5. Fill the Box with Treasure
- Place plastic gold coins (or paper circles/buttons) inside the shoebox, directly under the end of the rainbow slide.
- Add a little glitter inside for extra sparkle.
6. Add Shamrocks & Decorations
- Cut shamrock shapes and little grass tufts from green construction paper.
- Glue them around the outside of the box and near the glitter gold pile to make it festive.
7. Set the Trap
- Tilt the rainbow so it looks like a fun slide leading to all the gold.
- Tell kids the leprechaun will slide down the rainbow at night, land in the glitter “gold,” and get stuck while collecting treasure.
8. Optional Finishing Touches
- Add a tiny sign that says “Leprechaun Gold – Free!” to make it even more irresistible.
- Sprinkle a light trail of glitter or a few coins leading up to the rainbow slide.
2. Pot of Gold Pitfall
Use a black plastic cauldron filled with fake gold coins, placed over a hidden hole in a box, when the leprechaun reaches in, plop!

Supply List:
1 medium cardboard box with lid (shoe box or shipping box)
Black plastic cauldron (dollar-store Halloween cauldron works great)
Fake gold coins (plastic, foam, or cardboard circles)
Green shredded paper, tissue paper, or Easter grass
Brown or green craft paper (to cover the box – optional)
Green construction paper or foam shamrocks (optional décor)
Craft knife or adult scissors
Pencil & ruler
Hot glue gun or strong craft glue
Tape
Step-by-Step Instructions:
1. Prepare the Box Base
- Close and tape the box shut so it’s strong.
- If you want a polished look, cover the outside with brown or green craft paper and glue it down.
2. Mark the Pitfall Hole
- Place the cauldron upside down on top of the box in the center.
- Trace around the cauldron with a pencil to make a circle (or draw a slightly smaller circle so the cauldron rests on the edges).
3. Cut the Hole
- With adult help, use a craft knife to cut out the circle carefully.
- Remove the cardboard circle so you have a clean opening in the top of the box.
4. Create the Soft Landing
- Fill the inside of the box with green shredded paper or tissue to make a “clover bed” where the leprechaun will land.
5. Secure the Cauldron
- Place the cauldron over the hole so the bottom sits just inside the opening or rests on the edges.
- Use hot glue or strong craft glue around the rim of the cauldron to attach it firmly to the box. Let it dry.
6. Add the Gold Bait
- Fill the cauldron with fake gold coins so it looks overflowing and irresistible.
- Drop a few coins on the edge of the cauldron and around the box to “spill” the gold.
7. Decorate the Trap
- Glue shamrocks or green foam shapes around the sides of the box.
- You can also draw or glue on a small sign that says “FREE GOLD!” or “Leprechaun Treasure.”
8. Set the Trap
- Place a few coins right at the cauldron’s edge, as if they’re falling into the hole.
- Tell kids the leprechaun will lean in to grab the gold, slip through the opening, and land in the soft grassy pit below, plop!
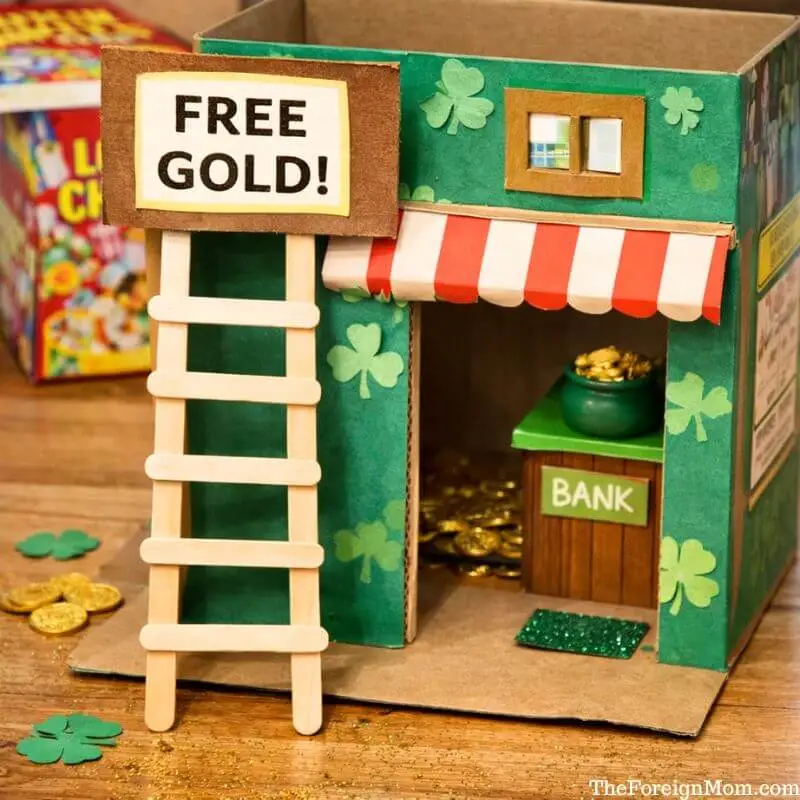
3. Lucky Ladder Trap
Build a ladder from popsicle sticks leading into a decorated cereal box. Add a “FREE GOLD” sign to lure him inside.
Supply List:
1 empty cereal box
Green construction paper or green paint (to cover box)
Brown or kraft paper (for “ground” flap – optional)
Popsicle sticks (8–12, depending on ladder height)
Small piece of cardboard or foam board (for the “FREE GOLD” sign)
White paper for sign background
Marker or letter stickers (“FREE GOLD!”)
Fake gold coins or yellow paper circles
Small container or mini pot (optional, for gold inside box)
Glue stick and/or liquid craft glue
Scissors
Tape
Green paper shamrocks or stickers (optional décor)
Step-by-Step Instructions:
1.Prep the Cereal Box
- Open the top of the cereal box so the leprechaun can fall inside.
- Cut off the top flaps or fold one flap forward to make a “porch” if you like.
- Cover the outside of the box with green construction paper or paint it green. Let it dry.
2. Create the Entrance
- On the front of the box, cut a doorway near the bottom large enough for a leprechaun-sized toy to crawl through.
- If you left a flap, fold it outward to act as a little ramp or floor.
3. Decorate the Front
- Glue on shamrocks, draw windows, or add a striped “awning” with strips of colored paper above the doorway to make it look like a tiny shop or leprechaun house.
4. Build the Popsicle Stick Ladder
- Lay two popsicle sticks vertically on the table (these are the ladder rails).
- Cut or break a few sticks into shorter pieces for the rungs.
- Glue the rungs horizontally across the rails, leaving even space between each one.
- Let the ladder dry completely.
5. Attach the Ladder
- Lean the ladder from the ground up to the top edge of the cereal box, or to the doorway if you prefer.
- Use tape or dots of glue at the top to secure it so it doesn’t slide.
6. Make the “FREE GOLD” Sign
- Cut a small rectangle from cardboard or foam board.
- Glue a piece of white paper on top.
- Write “FREE GOLD!” in big, bold letters with a marker.
- Glue or tape the sign to the top or side of the box, or attach it to the ladder, so the leprechaun sees it while climbing.
7. Set Up the Gold Inside
- Place fake gold coins or a mini pot of gold just inside the doorway or at the bottom of the box.
- Scatter a few coins at the base of the ladder to act as a trail.
8. Finish the Trap
- Add extra shamrocks or glitter around the entrance to make it look even more magical.
- Explain to kids that the leprechaun will climb the ladder to reach the “FREE GOLD” and end up tumbling inside the cereal box trap.
4. Shamrock Garden Disguise
Make a grassy field out of green paper strips with shamrocks everywhere. The middle shamrock lifts up and drops into a trap.

Supply List:
1 shallow cardboard box or lid (shirt box or packing box)
Green construction paper (several shades if possible)
Green cardstock (for sturdier shamrocks)
Scrap cardboard (for trapdoor flap)
Gold glitter or green/gold confetti
Fake gold coins or yellow paper circles
Scissors
Glue stick and liquid glue
Tape
Pencil
Optional: shamrock stickers, green tissue paper, green marker
Step-by-Step Instructions:
1.Prepare the Base
- Use the bottom of a shallow box or a box lid as your “field.”
- Cover the inside with green construction paper and glue it down.
2. Create the Grass Strips
- Cut several long strips of green paper about 1–2 inches wide.
- Snip along one side of each strip to make fringe (don’t cut all the way through).
- Glue these fringed strips around the edges of the box, fringe side pointing up, to look like tall grass.
3. Cut Shamrocks
- Draw and cut out lots of shamrocks in different sizes from green paper or cardstock.
- Set aside one larger shamrock for the “secret” middle shamrock lid.
4. Make the Trap Opening
- Decide where the center shamrock will go. Lightly trace its outline in the middle of the box.
- Inside that outline, draw a slightly smaller square or rectangle and carefully cut it out to create a hole. (Adult help here.)
5. Create the Trapdoor Shamrock
- Cut a small piece of cardboard just a bit larger than the hole, this is your trapdoor.
- Glue the large shamrock on top of the cardboard.
- Tape one edge of the cardboard piece to the box so it can lift up like a hinge. The shamrock should sit flat and cover the hole when closed.
6. Add the Hidden Treasure
- Place a small pile of fake gold coins or a tiny container of coins in the box directly under the hole.
- Add a little green tissue paper or shredded paper around it as a soft landing.
7. Decorate the Garden
- Glue more shamrocks onto the grassy edges and “ground” around the center.
- Spread a thin layer of liquid glue in spots and sprinkle with gold glitter to look like magical fairy dust.
8. Blend the Trapdoor
- Make sure the shamrock trapdoor lies flat and blends with the rest of the garden.
- You can glue a bit of fringed grass at its base (not over the hinge) to help disguise the edge.
9. Set the Trap
- Sprinkle a few coins and glitter leading toward the center shamrock.
- Tell kids the leprechaun will step on the “lucky” shamrock to grab the gold. Then the flap lifts and he falls gently into the hidden treasure spot below.
5. Gold Coin Tunnel
Use paper towel tubes painted gold. One end leads into a covered cardboard box that closes behind the leprechaun.

Supply List:
1 medium cardboard box with lid (shoebox or shipping box)
2–3 empty paper towel tubes
Gold acrylic paint or gold wrapping paper/foil
Paintbrush (if painting)
Fake gold coins or yellow paper circles
Green construction paper or felt (for “grass” and shamrocks)
Cardstock or cardboard for a sign (“GET RICH!” or “FREE GOLD”)
Scissors
Craft knife (adult use)
Glue stick and/or hot glue
Tape
Pencil & ruler
Optional: gold glitter
Step-by-Step Instructions:
1.Prepare the Box Base
- Close and tape the box so it’s sturdy.
- If it has a separate lid, keep it attached to one long side as a hinge.
- Cover the outside with brown or green paper if you want a cleaner look.
2. Cut the Tunnel Entrance
- On one short side of the box, draw a rectangle slightly smaller than the paper towel tube’s opening.
- With adult help, cut out the rectangle to make the tunnel entrance into the box.
3. Decorate & Build the Gold Tunnel
- Paint the paper towel tubes gold or wrap them in gold paper/foil and glue in place.
- Once dry, line up the tubes end-to-end to make one long tunnel and glue or tape them together.
4. Attach the Tunnel to the Box
- Slide one end of the tunnel into the rectangular opening you cut in the box.
- Glue or tape it securely from the inside and outside so it won’t move.
5. Create the “Closing” Lid
- Use the box lid as the trap cover: when it’s open, the leprechaun can crawl in; when it’s shut, he’s trapped.
- To make it feel like it “closes behind” him, prop the lid open with a small folded piece of cardboard.
- Kids can gently bump the box or remove the prop so the lid falls shut after the leprechaun “goes through” the tunnel.
6. Add the Treasure Bait
- Place a pile of fake gold coins inside the box near the end of the tunnel.
- Scatter a few coins inside the tunnel and just outside its entrance to tempt him.
7. Decorate the Top of the Box
- Cover the top with glue and sprinkle green paper confetti or glitter for a sparkly “gold field.”
- Cut shamrocks from green paper/felt and glue them around the box and tunnel.
8. Make the Sign
- Cut a rectangle from cardstock, write “GET RICH!” or “FREE GOLD!” in bold letters, and glue it onto a slightly larger green rectangle.
- Attach the sign to the top of the box using craft sticks or cardboard strips as posts.
9. Set the Trap
- Lay the tunnel on a “grass” mat made from green paper so it looks like a secret underground gold passage.
- Leave the lid propped open, coins shining inside.
- When the leprechaun crawls through for the gold, the lid drops down behind him, and the trap springs!
6. Rainbow Bridge Collapse
Craft a rainbow bridge from pipe cleaners over a small gap. When the leprechaun steps on it, it “collapses” into a soft trap below.

Supply List:
1 shallow cardboard box or lid (shirt box or packing box)
Green construction paper (to cover box)
Rainbow-colored pipe cleaners (red, orange, yellow, green, blue, purple)
Extra green tissue paper or shredded paper (for soft landing)
Fake gold coins or yellow paper circles
Gold glitter (optional but fun)
Scissors
Craft knife (adult use)
Glue gun or strong craft glue
Tape
Pencil & ruler
Step-by-Step Instructions:
1.Prep the Base
- Use the bottom of a shallow box as your base.
- Cover the outside and top edges with green construction paper and glue it down.
2. Cut the Pit Opening
- In the center of the box, mark a rectangle or square where the “gap” will be.
- With adult help, cut out the shape so there’s a hole in the middle of the box.
3. Create the Soft Trap Below
- Inside the box, directly under the hole, stuff crumpled green tissue paper or shredded paper to make a soft landing.
- Place some gold coins on top of the tissue so it looks like treasure at the bottom.
4. Build the Rainbow Bridge
- Line up your pipe cleaners in rainbow order.
- Twist the ends together on one side, then on the other, so they form one sturdy rainbow strip.
- Gently bend the pipe cleaners into an arch that can reach from one side of the gap to the other.
5. Attach “Collapse” Supports
- Cut two small cardboard strips slightly longer than the width of the gap.
- Place one strip on each side of the opening so they can hold the ends of the rainbow like a shelf.
- Option A (simple pretend collapse): Glue the rainbow securely to the strips so kids can imagine it “collapsed” when the leprechaun crosses.
- Option B (more interactive): Lightly tape the ends of the rainbow to the strips so with a little bump or tug, the tape lets go and the rainbow falls into the pit.
6. Decorate Around the Bridge
- Glue gold coins along both sides of the gap and sprinkle a little glitter to look like magic dust.
- Add extra green paper or tissue around the edges to look like bushes or clover mounds.
7. Final Touches
- Scatter a few coins leading onto the bridge to tempt the leprechaun.
- Optionally add a tiny sign at one end: “Rainbow Bridge to GOLD!”
8. Set the Trap
- Place the trap where kids can admire it.
- Explain that when the leprechaun tiptoes across the rainbow to reach the shiny gold, the bridge gives way and he tumbles safely into the soft, glittery treasure pit below.
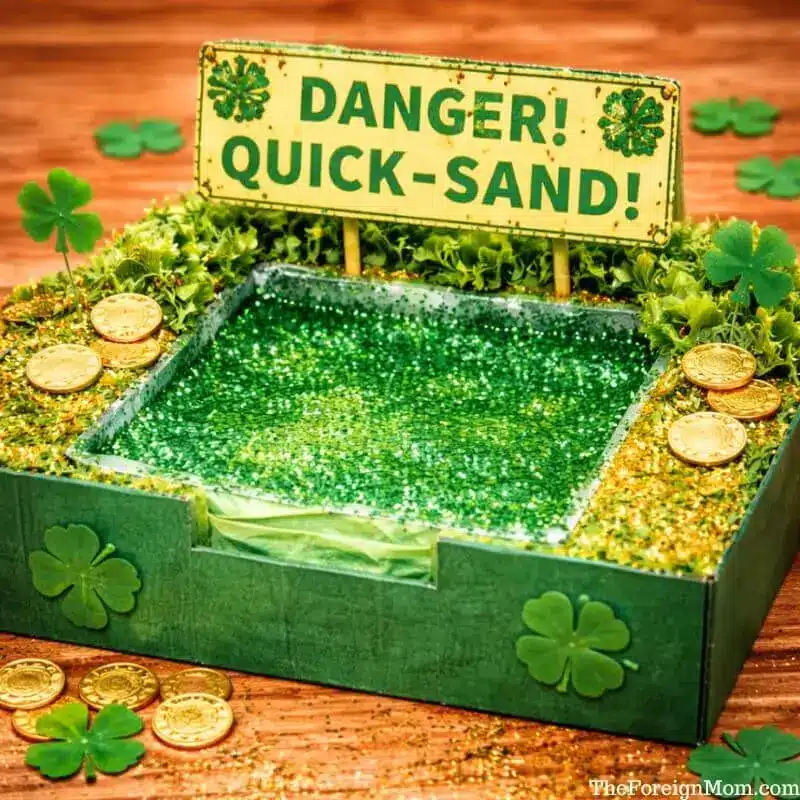
7. Glitter Glue Quick-Sand
Make a sparkling “quicksand” pool using glue mixed with green glitter. Place it over plastic wrap on top of a box so he sinks through.
Supply List:
1 shallow cardboard box or box lid
Green construction paper (to cover box – optional)
Clear plastic wrap (cling film)
White school glue or clear glue (about 1 small bottle)
Green glitter (fine + chunky if you have both)
Fake gold coins or yellow paper circles
Green tissue paper or shredded paper (for decoration)
Cardstock for a sign (optional: “Danger! Quicksand!”)
Markers or letter stickers for sign
Scissors
Tape
Glue stick & liquid glue
Step-by-Step Instructions:
1.Prep the Box Base
- Use a shallow box or lid as the base.
- Optional: cover the outside with green construction paper for a neater look.
2. Make the “Quicksand Window”
- On the inside of the box, draw a large rectangle or circle in the center.
- Cut out this shape so you have a big opening in the middle. (Adult help here.)
3. Add the Plastic Wrap Layer
- Flip the box over. From the underside, stretch a large piece of plastic wrap across the opening.
- Pull it snug but not too tight so it can “sag” a little with weight.
- Tape the plastic wrap securely all the way around the edges of the hole.
4. Create the Glitter Glue “Quicksand”
- In a disposable cup or small bowl, squeeze in a generous amount of white or clear glue.
- Add lots of green glitter (and a bit of gold if you like).
- Stir until it’s thick and sparkly.
5. Pour the Quicksand Pool
- Turn the box right-side up again.
- Slowly pour the glitter glue mixture onto the plastic wrap in the opening, spreading it out with a craft stick so it covers the whole “pool.”
- Sprinkle a little extra glitter on top and gently press in a few gold coins so they look partly sunk.
6. Decorate the Edges
- Crumple green tissue paper or use shredded paper to build a leafy “bank” all around the pool.
- Glue it down along the inner edges of the box.
7. Add a Warning Sign (Optional)
- Cut a rectangle of cardstock and write “DANGER! QUICK-SAND!” or “MAGIC MUD!”
- Tape or glue the sign to two strips of cardboard or craft sticks and attach them to the back of the box.
8. Set the Trap
- Scatter a few coins around the edge of the pool as bait.
- Kids can place a small leprechaun toy or figure on the glitter glue. He will gently sink into the “quicksand” as the glue settles on the stretchy plastic wrap, while the real trap is the box space below.
8. Leprechaun Hotel
Make a mini cardboard hotel with a check-in desk and “free breakfast.” When he goes inside, a flap door closes.

Supply List:
1 small cardboard box with lid (shoe box or similar)
Extra scrap cardboard (for walls, desk, door, sign)
Green construction paper or green paint (to cover box)
Gold glitter (optional)
Fake gold coins
Small bead, pom-pom, or bell (for “desk bell”)
Markers or letter stickers (“Leprechaun Hotel,” “Check-In,” “Free Breakfast”)
Glue stick & liquid craft glue or hot glue
Tape
Scissors
Craft knife (adult use)
Pencil & ruler
Step-by-Step Instructions:
1.Prep the Hotel Building
- Stand the box on its side so the open part faces forward like a stage.
- Cover the outside and inside back wall with green paper or paint it green. Let it dry.
2. Create the Lobby Floor
- Cut a piece of cardboard a bit larger than the box’s opening to act as a “front porch.”
- Glue or tape it to the bottom front edge of the box. Cover with green paper and sprinkle a little glitter for magic.
3. Add the Check-In Desk
- Cut a rectangle of cardboard for a counter that fits along one inside wall.
- Cover it with green paper and add a strip of gold glitter along the top.
- Glue it inside the box about halfway back.
- Glue on a small bead or pom-pom as the “bell.”
- Make a mini “CHECK-IN” sign and glue it to the front of the desk.
4. Build the “Free Breakfast” Area
- On the porch or inside corner, place a small bottle cap, tiny plate, or circle of cardboard as the breakfast table.
- Glue on beads, tiny pom-poms, or rolled paper to look like donuts or pastries.
- Add a little sign that says “FREE BREAKFAST.”
5. Make the Flap Door Trap
- Cut a tall rectangle from cardboard for the hotel door, sized to cover one side of the opening.
- Tape or glue it to the inside edge of the box with a strip of tape along one vertical side so it swings like a door.
- To make it close by itself, tape a short string to the free edge of the door and run the string out the back or side of the box. Kids can gently pull it to shut the door after the leprechaun “goes in.”
6. Decorate the Inside Walls
- Cut and glue little windows, shamrocks, or stars from green and yellow paper to decorate the lobby.
- Add a sprinkle of glitter along the floor.
7. Create the Hotel Sign
- Cut a long rectangle of cardboard for the sign.
- Cover it with green paper and write “LEPRECHAUN HOTEL” in bold letters.
- Add glitter around the edges.
- Glue it to the roof/front top of the box so it sticks up like a marquee.
8. Add the Gold Bait
- Place fake gold coins on the check-in desk, near the breakfast plate, and just inside the doorway.
- Scatter a few coins on the porch to lead the leprechaun in.
9. Set the Trap
- Leave the door slightly open so the hotel looks welcoming.
- Once the leprechaun “checks in” for his free breakfast and gold, kids pull the string to swing the door shut, now he’s trapped inside the Leprechaun Hotel for the night!
9. Sparkly Stairs Trick
Build stairs from Legos that lead to a platform with a hole covered lightly with tissue paper. Place shiny coins on top.

Supply List:
LEGO baseplate
Assortment of LEGO bricks (greens for base, rainbow colors for steps)
Flat LEGO plates for top platform
Thin white tissue paper (or facial tissue, 1–2 layers)
Clear tape or small rubber band
Fake gold coins or yellow buttons/paper circles
Optional: a little gold glitter
Step-by-Step Instructions
1.Build the Base Block
- On the baseplate, build a solid “hill” or block with green LEGO bricks (a rectangle about 8×8 studs or larger).
- Leave the center top section open so there’s a small hollow space inside for the leprechaun to fall into.
2. Create the Hidden Hole
- On the top of the hill, arrange flat plates around the open center, forming a square “frame” and leaving a hole in the middle (big enough for a leprechaun figure).
- Make sure the edges are level so tissue can sit on top.
3. Add the Rainbow Stairs
- From the ground up to the top platform, build a staircase using rainbow-colored LEGO bricks (red, orange, yellow, green, blue, purple).
- Secure each step firmly to the baseplate and the hill so it’s sturdy.
4. Cover the Hole with Tissue
- Cut a small square of tissue paper slightly larger than the hole.
- Gently lay it over the opening so it rests on the LEGO frame.
- Lightly tape or tuck the edges of the tissue under nearby bricks so it stays flat, but don’t stretch it too tight, you want it to break when pressed.
5. Add the Sparkly Bait
- Place fake gold coins on top of the tissue paper right over the hole.
- Optional: sprinkle a pinch of gold glitter on the steps and platform for extra sparkle (keep it light so it doesn’t weigh down the tissue).
6. Decorate the Scene
- Add a few extra green bricks or shamrock stickers around the base.
- You can build a tiny sign from LEGO or cardboard that says “GOLD THIS WAY” or “STAIRS TO TREASURE.”
7. Set the Trap
- Put a small leprechaun figure at the bottom of the stairs for kids to move.
- When he “climbs” the sparkly stairs and steps onto the coins, the tissue tears and he drops into the hollow space inside the LEGO hill, caught by the Sparkly Stairs Trick!
10. Magic Hat Trap
Use a large top hat (paper or plastic) propped with a stick. Tie a string to the stick, classic trap style.

Supply List:
1 large black top hat (plastic dress-up hat or paper one)
Green ribbon, glitter tape, or construction paper strip (for hat band, optional)
Small piece of gold paper/foam for buckle (optional)
Wooden dowel, paint stir stick, or sturdy pencil (to prop the hat)
String or yarn (about 1–2 feet long)
Fake gold coins or yellow paper circles
Green paper shamrocks or felt shamrocks (optional décor)
Green cardstock or cardboard for a “FREE GOLD” sign
Marker or letter stickers
Tape and/or hot glue
Step-by-Step Instructions:
1. Decorate the Top Hat (Optional but cute)
- Wrap green ribbon or a strip of green paper around the hat as a band and tape or glue it in place.
- Cut a square “buckle” from gold paper and glue it to the front of the band.
- Add shamrocks if you’d like.
2. Prepare the Trap Area
- Choose a flat surface (table, floor, or a green LEGO baseplate/foam board).
- Scatter a little “gold trail” where you want the hat to sit.
3. Set Up the Gold Bait
- Make a small pile of fake gold coins on the floor where the opening of the hat will be.
- You want most of the coins to end up inside the hat when it falls.
4. Prop the Hat
- Place the hat upside down over the coin pile, tilted on its rim so there’s an opening for the leprechaun to crawl under.
- Use the stick as a prop: one end on the floor just inside the rim, the other end holding up the side of the hat.
5. Attach the String
- Tie one end of the string firmly around the middle of the stick.
- Run the other end of the string out to where your child can easily reach it and hold it.
6. Make the “FREE GOLD” Sign
- Cut a rectangle from cardstock and write “FREE GOLD!” or “LEPRECHAUN TREASURE” in big letters.
- Tape the sign to a shorter stick or directly to the main prop stick so it stands near the hat opening and tempts the leprechaun.
7. Add Final Decorations
- Scatter a few coins and shamrocks leading up to the hat opening like a path.
- Optional: add a bit of (kid-safe) glitter or confetti around the coins.
8. Set the Trap
- Have your child hide nearby, holding the loose end of the string.
- When the “leprechaun” (toy, sibling, or imagination!) goes under the hat to get the gold, they tug the string.
- The stick pulls away, the hat drops down, and the Magic Hat Trap captures the leprechaun along with his gold.
11. Gold Mine Dig Site
Make a “dig site” using kinetic sand or rice with gold coins peeking through. When he digs, the floor gives way.

Supply List:
Shallow bin, baking tray, or plastic storage container
Kinetic sand or dry rice (enough to fill the tray 1–2″ deep)
Cardboard box or small plastic container (to be the hidden “drop pit”)
Extra scrap cardboard (for a false floor lid)
Gold plastic coins or foil-wrapped chocolate coins
Small “gold bars” (wrapped boxes/blocks, optional)
Small shovel, scoop, or spoon
Construction paper or craft stick + cardstock for “Gold Mine Dig Site” sign
Tape or hot glue (adult use)
Scissors
Optional: Mini cauldron, leprechaun hat, green confetti, or shamrock table scatter
Step-by-Step Instructions:
1.Prepare the Dig Tray
- Place your shallow bin or baking tray on a flat surface.
- Decide where you want the “trap pit” to be (usually one corner or the middle).
2. Create the Hidden Drop Pit
- Take a small cardboard box or plastic container that fits inside the tray.
- Cut the box height down so its top sits just below the rim of the tray.
- Place it in the chosen spot, this is where the leprechaun will “fall” through.
3. Make the False Floor
- Cut a piece of cardboard just big enough to cover the top of the small box.
- Lightly score or bend it once down the middle so it’s a bit weaker and can “give way” when pressed.
- You can rest this piece loosely on top of the box or hinge one side with a small piece of tape, so it flips open when weight is applied.
4. Hide the Treasure Inside the Pit
- Place a pile of gold coins (and optional wrapped candy or “gold bars”) inside the small box under the false floor.
- Make sure the cardboard lid still sits flat and can open when pushed.
5. Cover with Sand or Rice
- Pour kinetic sand or rice around the box, filling the rest of the tray.
- Gently add a thin layer over the false floor too, just enough to hide it but not so heavy that it can’t open.
6. Decorate the Gold Mine
- Press a few gold coins halfway into the sand or rice so they peek out like buried treasure.
- Add mini “gold bars,” a small pot or cauldron, and a tiny shovel to make it look like an active dig site.
7. Create the Sign
- Cut a small rectangle of cardstock and write “GOLD MINE DIG SITE.”
- Glue or tape it to a craft stick and stick it into the sand/rice at the back of the tray.
8. Set the Trap
- Leave a little trail of coins leading to the dig site.
- Add a note inviting the leprechaun to “dig for more gold” right over the hidden pit.
9. Morning Magic Reveal
- Overnight, an adult can scatter some sand/rice, move coins around, and leave a bit of “evidence” like a few coins spilled out of the pit or a tiny note thanking the kids for the gold.
- Let kids dig, discover the pit, and find the hidden treasure that “fell through” the floor.
12. Rainbow Balloon Lift Trap
Tie rainbow balloons to a small box. When the leprechaun steps inside for the gold, the lid snaps shut.

Supply List:
Small box with lid (shoebox, gift box, or craft treasure chest)
Green paint or green construction paper (to cover the box)
Glitter glue, stickers, or shamrock cutouts (for decorating)
Gold plastic coins or foil-wrapped chocolate coins
5–7 small latex balloons (red, orange, yellow, green, blue, purple)
Balloon string or curling ribbon
Tape (clear or masking)
1 craft stick, pencil, or drinking straw (to prop the lid)
String or yarn (about 12–18 inches)
White paper and markers (“FREE GOLD!” sign)
Scissors
Step-by-Step Instructions:
1.Decorate the Treasure Box
- Paint the box green or cover it with green paper.
- Add glitter, shamrock stickers, or a gold border to make it look magical.
- On a strip of paper, write “FREE GOLD!” and tape it to the front of the box.
2. Fill with Bait
- Place a generous pile of gold coins inside the box.
- Leave a few coins right near the front edge so the “leprechaun” has to step fully inside to grab them.
3. Attach the Rainbow Balloons
- Inflate each balloon in rainbow order: red, orange, yellow, green, blue, purple.
- Tie a string or ribbon to each balloon.
- Gather all the balloon strings together and tape or tie them securely to the back of the box so they look like they’re “lifting” it. (They don’t need real helium; it’s just for the look.)
4. Create the Lid Trigger
- Open the lid of the box.
- Use a craft stick, pencil, or straw to prop the lid open just an inch or two.
- Tie one end of a piece of string to the middle of the stick.
- Tape or tie the other end of the string to a “bait coin” or small paper tag that sits inside the box, right where the leprechaun will reach.
5. Set the Trap
- Place the box on the floor or a low table.
- Arrange a trail of gold coins leading right into the center of the box, where the bait coin is attached to the string.
- Carefully balance the lid so the stick holds it open. When the string is pulled, the stick will slip, and the lid will fall shut.
6. Explain the Magic to Kids
- Tell kids that when the leprechaun steps in and tugs on that shiny “extra special” coin, the stick gets yanked out and the lid snaps closed, trapping him inside the rainbow balloon treasure chest.
7. Morning Reveal
- Overnight, an adult can gently knock the lid closed, scatter some coins, and leave a tiny note inside the box from the leprechaun (“Nice try! Thanks for the gold!”).
- Kids will wake up to a sprung trap, a balloon rainbow, and a fun little surprise.
13. Rainbow Cup Trap
Use a rainbow-striped plastic cup propped with a pencil. Put chocolate gold coins underneath.

Supply List:
Rainbow-striped plastic or paper cup
Pencil, marker, or wooden skewer (to prop the cup)
Chocolate gold coins or gold-wrapped candies
String or yarn (optional, for pulling the pencil)
Tape (optional)
Small piece of cardboard or paper towel (optional base)
Floor space, table, or cardboard surface
Step-by-Step Instructions:
1. Set the Cup
- Turn the cup upside down on the floor or table.
- Lift one edge slightly so there’s space underneath for the gold coins.
2. Prop the Trap
- Slide the pencil under the edge of the cup to hold it up.
- Make sure the cup balances easily—it should fall with a small bump.
3. Add the Gold Bait
- Place chocolate gold coins under the open side of the cup.
- Let a few coins peek out so the leprechaun can see them.
4. Optional Pull String
- Tie or tape a piece of string to the pencil.
- Stretch the string away from the trap so kids can “activate” it later.
5. Test the Trap
- Gently tap the pencil or pull the string.
- The cup should fall right over the gold coins.
- Adjust if needed, crooked setups work best!
14. St. Patrick’s Day City
Build tiny cardboard buildings like “Leprechaun Bank” or “Gold Store.” One building is a trap with a falling floor.

Supply List:
1 medium cardboard box (shoebox or Amazon box)
Cardboard scraps (for signs and floor flap)
Craft glue or school glue
Tape (masking or painter’s tape)
Scissors (adult help)
Green paint, markers, or construction paper
Chocolate gold coins or gold-wrapped candies
String or yarn
Pencil, straw, or wooden skewer (for trigger)
Paper or stickers (shamrocks, rainbows)
Floor or table surface (wood floor works great)
Step-by-Step Instructions
1. Prep the Box
- Place the box upright so it looks like a simple building.
- Cut a rectangular opening on the front (this is the “gold window”).
- Leave the top closed or slightly angled for a clean, modern look.
2. Make the Falling Floor (Inside)
- Cut a cardboard rectangle slightly smaller than the inside bottom.
- Tape one edge only so it acts like a flap.
- Prop the flap up slightly with a pencil or rolled paper underneath.
- When the support is pulled, the floor tips and drops the gold inside.
(This stays hidden, no visible hole.)
3. Add the Gold
- Place chocolate coins on top of the flap floor.
- Let some coins peek out through the front opening.
4. Create the Trigger
- Tie the string to the pencil or support holding the floor up.
- Run the string out the side or back of the box.
- Light tug = floor tips = gold disappears.
5. Decorate the “City Building”
- Cover the box with green paper or paint it.
- Add a sign:
- “Leprechaun Bank”
- “Gold Store”
- “Free Gold!”
- Stick shamrocks, rainbows, or kids’ drawings on the front.
- Keep lines simple, boxy, and modern.
6. Test & Adjust
- Gently pull the string.
- Make sure the gold slides inside the box.
- Reset and adjust if needed (crooked is fine!).
15. Sparkling Shoe Box Surprise
Turn a shoebox into a glittering gold house. When he climbs the steps (made of Legos), a flap drops him inside.

Supply List:
1 shoebox (with lid)
Gold glitter paper or gold paint/markers
Craft glue or school glue
Tape (masking or painter’s tape)
Cardboard scraps (for the flap floor and signs)
LEGO bricks (for steps)
Pencil, straw, or wooden skewer (trigger support)
String or yarn
Chocolate gold coins or gold-wrapped candy
Scissors (adult help)
Stickers, paper shamrocks, or markers for decorating
Step-by-Step Instructions:
1. Prepare the Shoebox House
- Place the shoebox upright so it looks like a little house.
- Cut a small door opening in the front.
- Leave the lid attached; it will help hide the trap.
2. Decorate the House
Cover the outside with gold paper or paint.
Add windows, shamrocks, or a sign that says:
“FREE GOLD!”
“LEPRECHAUN HOUSE”
- Don’t worry about neat edges; messiness makes it more believable.
3. Make the Falling Floor (Inside)
- Cut a cardboard rectangle slightly smaller than the inside bottom.
- Tape one edge only so it works like a flap.
- Prop the flap up with a pencil or straw underneath.
- When the support is pulled, the flap tips and drops everything inside.
4. Create the LEGO Steps
- Stack LEGO bricks into a small staircase leading to the door.
- Place a gold coin on the top step to tempt the leprechaun.
- The steps don’t need to be straight; crooked is fine!
5. Add the Trigger
- Tie the string to the pencil or support holding the flap up.
- Run the string out the back or side of the box.
- Hide the string behind the house.
6. Add the Gold
- Place gold coins on the flap floor inside the box.
- Sprinkle a few coins outside near the steps.
- Put a small pot or pile of coins next to the door.
7. Test the Trap
- Pull the string gently.
- The floor should drop, and the coins disappear inside.
- Reset and adjust as needed.
Make It Extra Magical with Leprechaun Details
The magic is in the details. Adding small touches helps bring your trap to life and makes it irresistible to a tricky leprechaun.
Fun additions kids love:
A rainbow path leading to the trap
Trails of Lucky Charms or fun money
Tiny green hats, four-leaf clovers, and gold coins
A black pot or black pot of “gold”
A little ladder made from popsicle sticks
Fun signs like “Free Gold!” or “Good Luck!”
These details make the trap feel like it was built just for lucky leprechauns.
STEM Learning Hidden in Disguise

One reason parents love leprechaun traps? They’re a perfect STEM activity.
As kids build their own trap, they naturally practice:
Planning and sequencing
Cause and effect
Engineering basic structures
Creative problem-solving
A secret trap door, ramp, or falling floor turns a simple craft into a hands-on learning experience, without kids even realizing they’re learning.
If your kids love sensory play, try this homemade playdough activity next. It’s another fun, hands-on way to build creativity. You can also make a batch of this Play-Doh recipe for a quick sensory activity after you build your trap.
Tips for Parents (Especially Modern Parents)
If you’re a busy parent, keep it simple. These traps don’t need to be Pinterest-perfect to be magical.
Helpful tips:
Let kids take the lead, messy traps are often the best ideas
Use tape freely (this is not the time for perfection)
Focus on the story: the sneaky leprechaun, the escape, the mischief
Add a tiny surprise in the morning (footprints, green food, moved toys)
This is a fun way to connect, laugh, and lean into your child’s imagination.
Frequently Asked Questions
Here are a few quick answers to the most common questions parents ask about building leprechaun traps. Whether this is your first year or a fun tradition you repeat every March, these FAQs will help you get started with confidence and keep the magic going for your kids. 🍀
Leprechaun traps are perfect for kids of all ages. Toddlers can decorate, preschoolers can help build, and older kids can design complex creative traps.
Not usually 😉 But the mischievous leprechauns almost always leave behind signs of a visit, gold coins, green footprints, or moved traps.
No problem! Many easy leprechaun trap ideas use recycled materials like cereal boxes, toilet paper rolls, and cardboard tubes.
Final Thoughts: The Magic Is in the Making
Whether your child builds a rainbow leprechaun trap, a LEGO staircase, or a simple box with a clever twist, the real magic is in watching their creativity come to life.
These awesome leprechaun trap ideas aren’t about catching anything. They’re about laughter, imagination, and starting a leprechaun trap tradition your kids will remember long after the gold coins are gone.
Now grab your supplies, follow the ideas below, and let the fun begin. 🍀
If your kids love playful holiday traditions, you’ll also love these 100 Elf on the Shelf ideas.
Let’s Stay in Touch 🍀
Love fun crafts and easy traditions like these leprechaun traps? Follow me on Pinterest for more kid-friendly activities, seasonal crafts, and creative ideas you can save and use year after year. New ideas are added all the time, so you’ll always have something fun ready when inspiration strikes. 💚